For some reason, you have to extend your ec2 Linux server with our reboot and securely. In this port, you will learn how you can extend your ec2 Linux disk on aws.
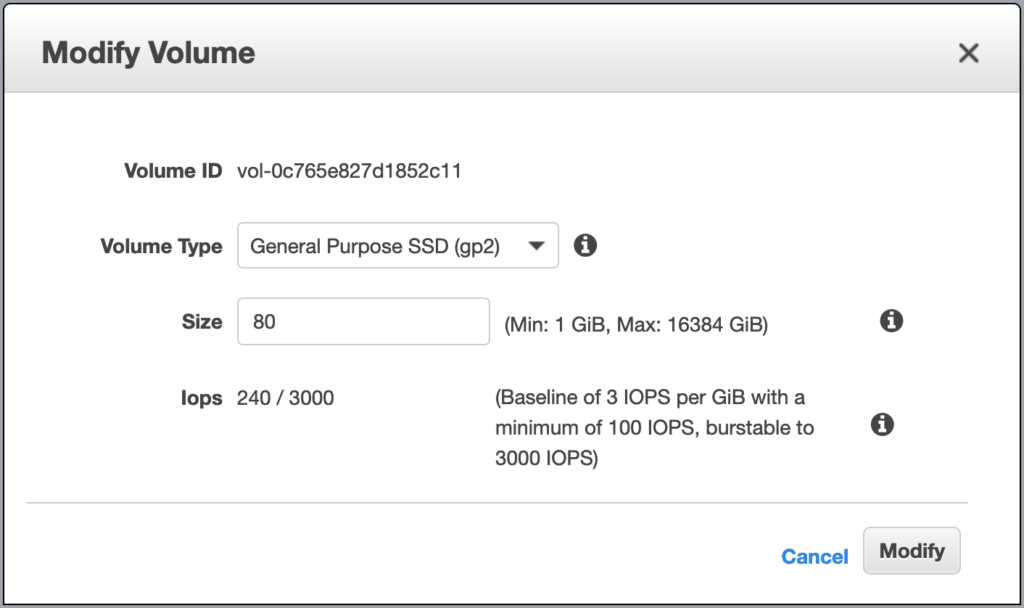
In this example, you will see extend the disk size from 80GiB to 120GiB.
Step 1: Modify Volume
Login to your AWS Console and find your ec2’s volume (disk). Here is the tip; in the left pane, there is an Elastic Block Store > Volumes. Right-click to your volume and then select the “Modify Volume” option. It looks like the below image. Choose your right size and click the Modify button.

Step 2: Check the disk size
First of you, you should be root or sudo in the server before run the commands. The first thing, we will check disk size, it should show the size before modify the volume. So, in this example, it shoud be a 80 GiB.
[root@server ~]# df -h
Filesystem      Size  Used Avail Use% Mounted on
devtmpfs        7.8G     0  7.8G   0% /dev
tmpfs           7.8G     0  7.8G   0% /dev/shm
tmpfs           7.8G  416K  7.8G   1% /run
tmpfs           7.8G     0  7.8G   0% /sys/fs/cgroup
/dev/nvme0n1p1   80G   51G   30G  64% /
tmpfs           1.6G     0  1.6G   0% /run/user/0
Yes, it says, the whole disk size is 80 GiB, that’s true. Now let’s check the list of block devices. The command output should show the new disk size on /dev/nvme0n1 device.
[root@server ~]# lsblk
NAME          MAJ:MIN RM  SIZE RO TYPE MOUNTPOINT
nvme0n1       259:0    0  120G  0 disk
├─nvme0n1p1   259:1    0   80G  0 part /
└─nvme0n1p128 259:2    0    1M  0 part
Yes! It says, the nvme0n1p1 is 80GiB but nvme0n1 is 120GiB. It means, we can extend our nvme0n1p1 part from 80GiB to 120GiB.
Step 3: Let’s Extend
Here is the magic;
[root@server ~]# growpart /dev/nvme0n1 1
CHANGED: partition=1 start=4096 old: size=167768031 end=167772127 new: size=251654111 end=251658207
The growpart command is just growed our disk partition, it doesn’t save yet and now we still don’t have a 120GiB disk. We should save the modification to the file system right now.
[root@server ~]# xfs_growfs /
meta-data=/dev/nvme0n1p1         isize=512    agcount=41, agsize=524159 blks
         =                       sectsz=512   attr=2, projid32bit=1
         =                       crc=1        finobt=1 spinodes=0
data     =                       bsize=4096   blocks=20971003, imaxpct=25
         =                       sunit=0      swidth=0 blks
naming   =version 2              bsize=4096   ascii-ci=0 ftype=1
log      =internal               bsize=4096   blocks=2560, version=2
         =                       sectsz=512   sunit=0 blks, lazy-count=1
realtime =none                   extsz=4096   blocks=0, rtextents=0
data blocks changed from 20971003 to 31456763
Step 4: Check the disk size again
Time to make sure about your new disk size. Here is the commands again for make sure.
[root@server ~]# df -h
Filesystem      Size  Used Avail Use% Mounted on
devtmpfs        7.8G     0  7.8G   0% /dev
tmpfs           7.8G     0  7.8G   0% /dev/shm
tmpfs           7.8G  412K  7.8G   1% /run
tmpfs           7.8G     0  7.8G   0% /sys/fs/cgroup
/dev/nvme0n1p1  120G   51G   70G  42% /
tmpfs           1.6G     0  1.6G   0% /run/user/0

[root@server ~]# lsblk
NAME          MAJ:MIN RM  SIZE RO TYPE MOUNTPOINT
nvme0n1       259:0    0  120G  0 disk
├─nvme0n1p1   259:1    0  120G  0 part /
└─nvme0n1p128 259:2    0    1M  0 part
Congrats! You successfully extended your aws ec2 Linux Server without reboot and/or lose any data on the EBS (Elastic Block Storage)
