
Bitbucket is an Atlassian product and Git-based code store and CI/CD optimized tools for collaboration teams using with Jira. When you change your code and keep a revisions and history in Bitbucket, you also need to some automation for deployment.
CI/CD is for every automation and it means Continuous Integration and Continues Delivery. In this article, we will use CI and CD in the same time.
I’m skipping “How to use Bitbucket?” and I’ll introduce to you about Bitbucket pipelines for continues deployment to the AWS S3 which is using CloudFront for the distribution to all over the world.
When you create static hosting supported S3 bucket, you should sync from your local folder to the S3 bucket. Normally, we should run the aws s3 sync LOCAL_FOLDER/ s3://STATIC_HOSTING_ENABLED_BUCKET_NAME --delete command for sync 100% local folder to the S3 Bucket.
If you are using a CloudFront for the distribution, you will see the old content when you visit the website. The reason is, CloudFront is caching the all content on all edge locations and serving the content from edge locations. We should “invalidate cache” for the new content and need to re-cache on the edge locations.
Which IAM Policy for S3 and CloudFront to use?
For maximum security, I really love to put maximum restriction and minimum allowance for IAM Policies. You can see the policies below:
S3 Bucket IAM Policy
{
    "Version": "2012-10-17",
    "Statement": [
        {
            "Sid": "S3BucketPolicy",
            "Effect": "Allow",
            "Action": [
                "s3:PutObject",
                "s3:GetObject",
                "s3:ListBucket",
                "s3:DeleteObject"
            ],
            "Resource": [
                "arn:aws:s3:::BUCKET_NAME",
                "arn:aws:s3:::BUCKET_NAME/*"
            ],
            "Condition": {
                "ForAnyValue:IpAddress": {
                    "aws:SourceIp": [
                        "34.199.54.113/32",
                        "34.232.25.90/32",
                        "34.232.119.183/32",
                        "34.236.25.177/32",
                        "35.171.175.212/32",
                        "52.54.90.98/32",
                        "52.202.195.162/32",
                        "52.203.14.55/32",
                        "52.204.96.37/32",
                        "34.218.156.209/32",
                        "34.218.168.212/32",
                        "52.41.219.63/32",
                        "35.155.178.254/32",
                        "35.160.177.10/32",
                        "34.216.18.129/32",
                        "3.216.235.48/32",
                        "34.231.96.243/32",
                        "44.199.3.254/32",
                        "174.129.205.191/32",
                        "44.199.127.226/32",
                        "44.199.45.64/32",
                        "3.221.151.112/32",
                        "52.205.184.192/32",
                        "52.72.137.240/32"
                    ]
                }
            }
        }
    ]
}
We will run our deployments in Bitbucket Pipelines and these IP addresses for Bitbucket Pipelines outbound IPs. You can see the reference from https://support.atlassian.com/bitbucket-cloud/docs/what-are-the-bitbucket-cloud-ip-addresses-i-should-use-to-configure-my-corporate-firewall/
CloudFront Cache Invalidation IAM Policy
For run the CloudFront cache invalidation command via Bitbucket Pipelines, you can use the IAM Policy below. You can attach the policy to the same AWS user which is allowed to S3 Sync operations.
{
    "Version": "2012-10-17",
    "Statement": [
        {
            "Sid": "CloudFrontCacheInvalidationPolicy",
            "Effect": "Allow",
            "Action": "cloudfront:CreateInvalidation",
            "Resource": "arn:aws:cloudfront::ACCOUNT_ID:distribution/CF_DISTRIBUTION_ID",
            "Condition": {
                "ForAnyValue:IpAddress": {
                    "aws:SourceIp": [
                        "34.199.54.113/32",
                        "34.232.25.90/32",
                        "34.232.119.183/32",
                        "34.236.25.177/32",
                        "35.171.175.212/32",
                        "52.54.90.98/32",
                        "52.202.195.162/32",
                        "52.203.14.55/32",
                        "52.204.96.37/32",
                        "34.218.156.209/32",
                        "34.218.168.212/32",
                        "52.41.219.63/32",
                        "35.155.178.254/32",
                        "35.160.177.10/32",
                        "34.216.18.129/32",
                        "3.216.235.48/32",
                        "34.231.96.243/32",
                        "44.199.3.254/32",
                        "174.129.205.191/32",
                        "44.199.127.226/32",
                        "44.199.45.64/32",
                        "3.221.151.112/32",
                        "52.205.184.192/32",
                        "52.72.137.240/32"

                    ]
                }
            }
        }
    ]
}
Bitbucket Pipelines
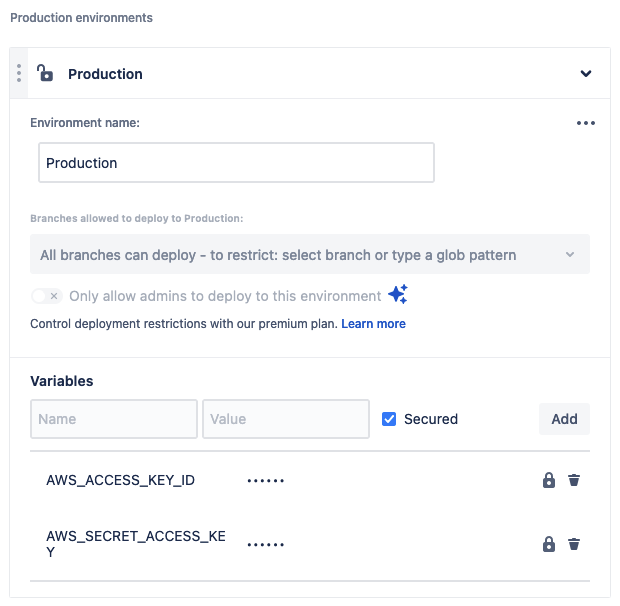
Previously, you already created a AWS user for run the Bitbucket Pipelines for CI/CD operations. The time is put the environment variables to the repository. The AWS_ACCESS_KEY_ID and AWS_SECRET_ACCESS_KEY is enough.
Pipeline File
Now, in this step, we can create a bitbucket-pipelines.yml file for run the S3 Sync and CloudFront Cache Invalidation.
pipelines:
    branches:
      main:
        - step:
            name: Deploy to S3 Bucket
            deployment: Production
            script:
              - pipe: atlassian/aws-s3-deploy:1.1.0
                variables:
                  AWS_ACCESS_KEY_ID: $AWS_ACCESS_KEY_ID
                  AWS_SECRET_ACCESS_KEY: $AWS_SECRET_ACCESS_KEY
                  AWS_DEFAULT_REGION: AWS-REGION
                  S3_BUCKET: 'S3_BUCKET_NAME'
                  DELETE_FLAG: 'true'
                  LOCAL_PATH: './'
              - pipe: atlassian/aws-cloudfront-invalidate:0.1.1
                variables:
                  AWS_ACCESS_KEY_ID: $AWS_ACCESS_KEY_ID
                  AWS_SECRET_ACCESS_KEY: $AWS_SECRET_ACCESS_KEY
                  AWS_DEFAULT_REGION: AWS-REGION
                  DISTRIBUTION_ID: CLOUDFRONT-DIST-ID
When main branch has a new commit, pipeline will trigger and start to run immediately. After that, your Bitbucket Repository root path "/" will sync to your S3 Bucket and run the Cache invalidation immediately to apply new website to all edge locations.
I hope, this article will help you. If you want to ask anything, just leave a comment. I’ll back to you as soon as possible I can.