Most of the time, we don’t need anything except AWS Certificate Manager (ACM) but in some cases, if you are hosting your customer’s domain with ALB and you don’t have a chance to get an SSL certificate from your customer, you should do some workaround. In this article, we will issue a Let’s Encrypt SSL on AWS Application Load Balancer and automatize it!
When you request an SSL certificate from Let’s Encrypt, the LE has some verification methods such as web-challenge, route53, etc. In this scenario, I decided to use web-challenge because domains’ DNS management is not on me. I just host the application and need to issue an SSL.
When you request an SSL with web-challenge, the Let’s Encrypt is checking the https://domain.com/.well-known/acme-challenge path to make sure and verify. What does it mean? It means, that Let’s Encrypt will send a request to the domain with port 80 and make verification. Hmm, we need do some adjusting on our Load Balancer config and need another Target Group for redirect the acme-challenge requests specifically.
Step 1: Run a new EC2 and Create a New Target Group
Clone The Repository
I wrote a bash script for easy management and keep the standards in the same way for every domain. You can check out my GitHub repository or clone the repository under the /opt/ path into acme-challange-server
Tip: # git clone https://github.com/flightlesstux/alble.git
Install nginx, Let’s Encrypt and configure them
When we get a /.well-known/acme-challenge/* request, the nginx installed EC2 will handle all acme-challenge requests and issue an SSL for us.
Install nginx and configure for /.well-known/acme-challenge/
You can easily install nginx with amazon-linux-extras install nginx1 command. After the installation, you should put a new location block on the nginx roof config. The root config file is located in /etc/nginx/nginx.conf
        location /.well-known/acme-challenge {
           root /opt/alble/certbot-challange;
        }
server_name value should be _; for all domains. We can’t set a static DNS name.
Install Certbot with the nginx module
First of all, we will install certbot from epel repository and we need to install epel first. For epel installation, you can use amazon-linux-extras install -y epel command and after just run yum install -y nginx certbot python2-certbot-nginx jq dig command to cover pre-requisites.
IAM Role Policy for acme-challenge Server
This acme-challenge the server has an IAM Role for accessing ACM and ALB operations with Let’s Encrypt SSLs. You can see the IAM Policy below.
{
    "Version": "2012-10-17",
    "Statement": [
        {
            "Sid": "AWSLEPolicy1",
            "Effect": "Allow",
            "Action": [
                "acm:DescribeCertificate",
                "acm:RemoveTagsFromCertificate",
                "acm:GetCertificate",
                "acm:AddTagsToCertificate",
                "acm:ListCertificates",
                "acm:ImportCertificate",
                "acm:ListTagsForCertificate"
            ],
            "Resource": "*",
            "Condition": {
                "IpAddress": {
                    "aws:SourceIp": "acme-challenge-server-Elastic-IP/32"
                }
            }
        },
        {
            "Sid": "AWSLEPolicy2",
            "Effect": "Allow",
            "Action": [
                "elasticloadbalancing:RemoveTags",
                "elasticloadbalancing:DescribeTags",
                "elasticloadbalancing:AddTags",
                "elasticloadbalancing:AddListenerCertificates"
            ],
            "Resource": "AWS::ALB::ARN",
            "Condition": {
                "IpAddress": {
                    "aws:SourceIp": "acme-challenge-server-Elastic-IP/32"
                }
            }
        },
        {
            "Sid": "AWSLEPolicy3",
            "Effect": "Allow",
            "Action": [
                "elasticloadbalancing:DescribeSSLPolicies",
                "elasticloadbalancing:DescribeListeners",
                "elasticloadbalancing:DescribeListenerCertificates"
            ],
            "Resource": "*",
            "Condition": {
                "IpAddress": {
                    "aws:SourceIp": "acme-challenge-server-Elastic-IP/32"
                }
            }
        },
        {
            "Sid": "AWSLEPolicy4",
            "Effect": "Allow",
            "Action": [
                "elasticloadbalancing:RemoveTags",
                "elasticloadbalancing:DescribeTags",
                "elasticloadbalancing:AddTags"
            ],
            "Resource": "AWS::ALB::ARN",
            "Condition": {
                "IpAddress": {
                    "aws:SourceIp": "acme-challenge-server-Elastic-IP/32"
                }
            }
        },
        {
            "Sid": "AWSLEPolicy5",
            "Effect": "Allow",
            "Action": [
                "elasticloadbalancing:DescribeSSLPolicies",
                "elasticloadbalancing:DescribeListeners",
                "elasticloadbalancing:AddListenerCertificates",
                "elasticloadbalancing:DescribeListenerCertificates"
            ],
            "Resource": "*",
            "Condition": {
                "IpAddress": {
                    "aws:SourceIp": "acme-challenge-server-Elastic-IP/32"
                }
            }
        }
    ]
}
You can attach this policy directly to the acme-challenge server without any security issue and leak after assigning an Elastic IP to it. If you want to use local credentials, you can also use the same IAM Policy.
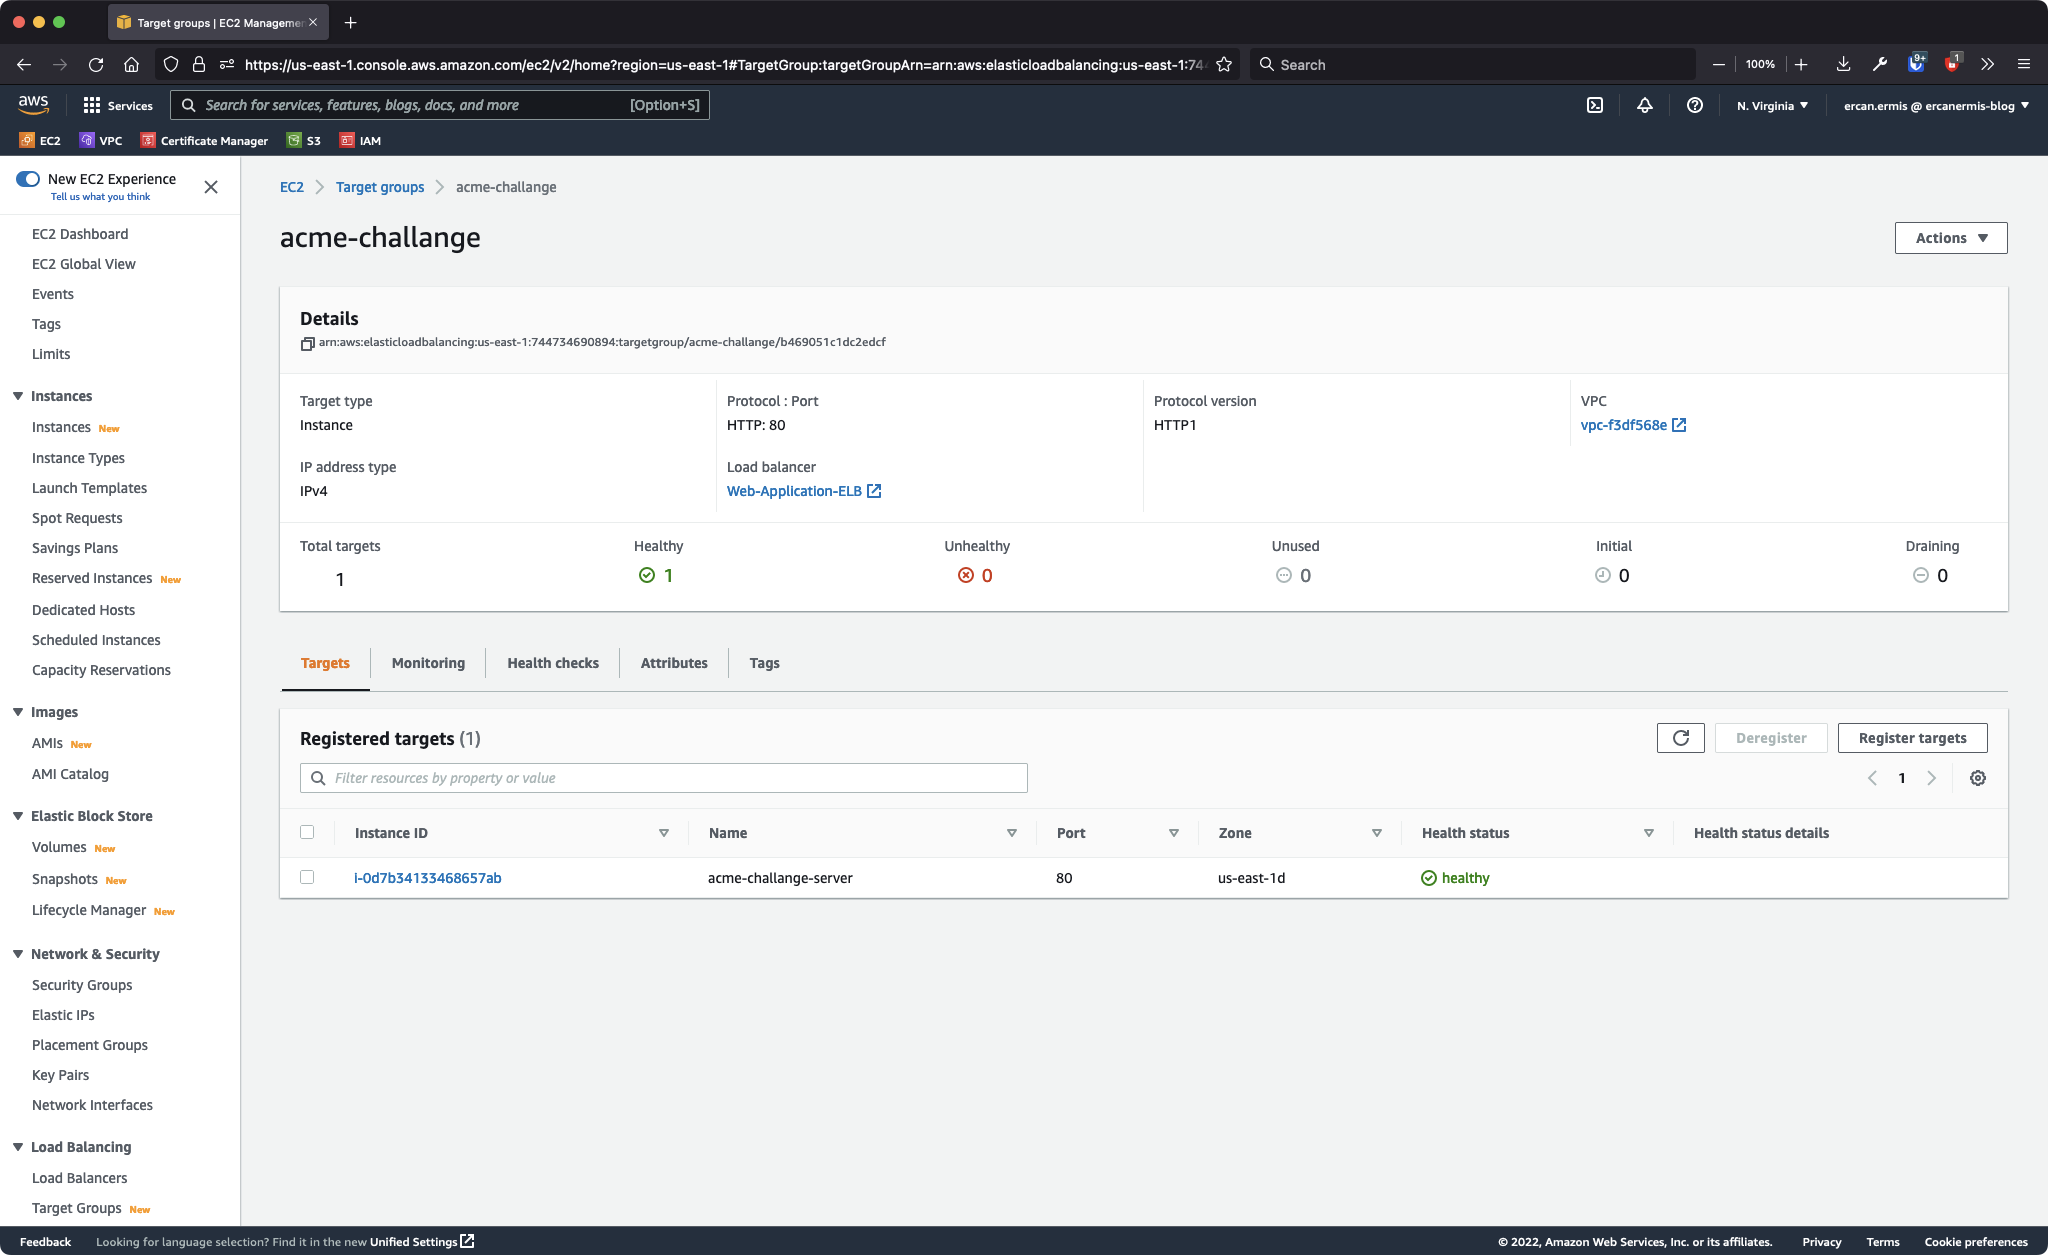
Create a New Target Group
After EC2 instance configuration, I created a Target Group which name is acme-challenge and I redirect the request to the nginx installed EC2 which name is acme-challange-server and I register ours acme-challenge-server as a target. If everything goes without any problem, your screen will look like this below.
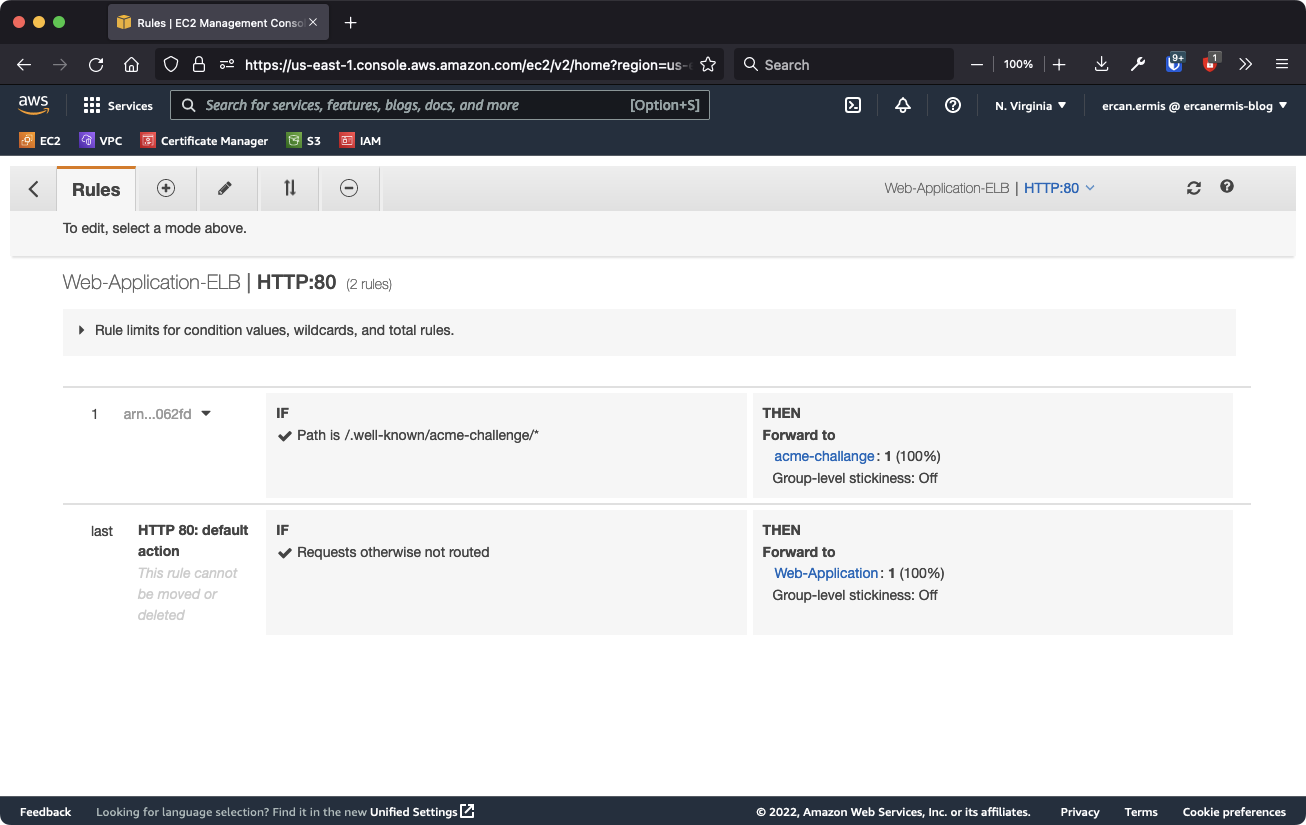
Step 2: Create an Application Load Balancer Listener Rule
We need to edit and create a new listener rule to accept and redirect the /.well-known/acme-challenge/* requests to the acme-challenge Target Group. When you did this step, you screen will look like this below.
Now, we are ready to request a Let’s Encrypt SSL from ACME and issue without any problem and import to ACM and assign to AWS ALB : ) This operation contains three different steps for issuing.
- Request an SSL from Let’s Encrypt
- Import requested SSL if domain or subdomain matched with AWS ALB CNAME record
- Assign the imported SSL certificate to the AWS ALB for use in production
Let’s Issue and Request a Let’s Encrypt SSL from ACME
When you clone the git repository, you should move /opt/alble/renewal-hooks the folder to under /etc/letsencrypt/ path. Otherwise, you can’t renew the certificate on the ACM and your and your customers’ security be failed. You can copy and paste mv /opt/alble/renewal-hooks /etc/letsencrypt/
Just read the README.md file on the git repository and write your variables to the env file. After that, you can easily run/manage/create the Let’s Encrypt SSL certificates on AWS Application Load Balancer. I recommend an AWS SSM to run the command to acme-challange-server for issue an SSL. For this, you should add ![]() AmazonEC2RoleforSSM
AmazonEC2RoleforSSM
I decided to use a subdomain for testing but it doesn’t matter. You can also use a root domain. My test domains are awsle-1.ercanermis.com and awsle-2.ercanermis.com
When you are in /opt/alble/ path, you can run the command like ./create-new-site.sh awsle-1.ercanermis.com and you will see the output like below.
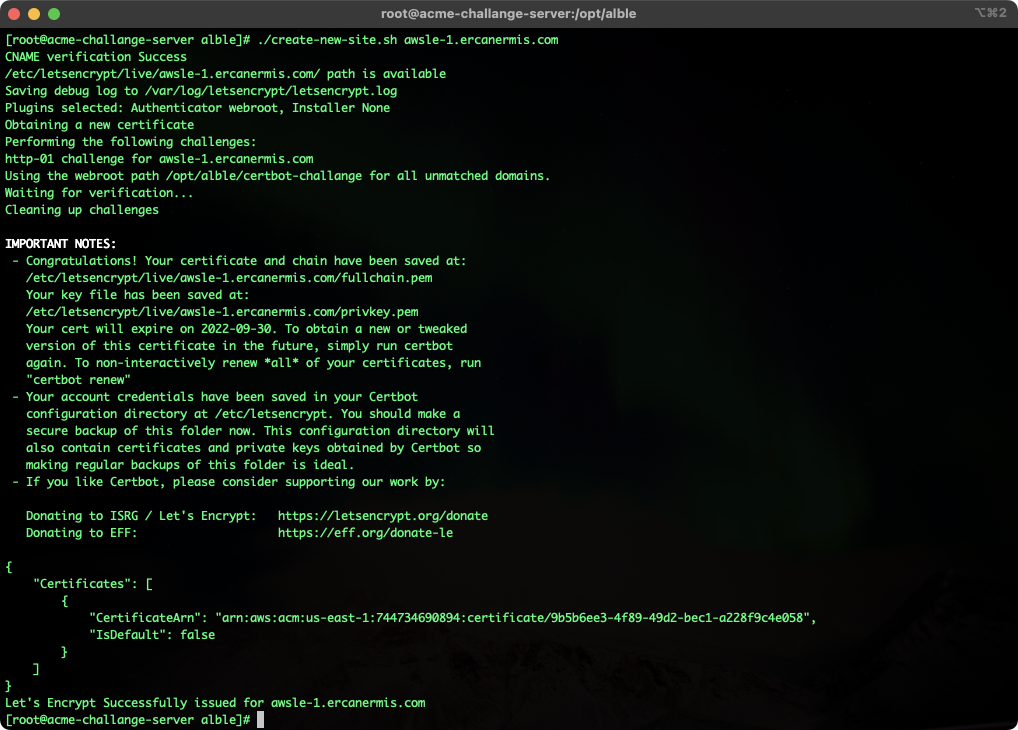
My ALBLe script is checking the CNAME record first for the domain and/or subdomain and making sure before continuing. If you write a wrong domain/subdomain or made a typo, it will warn you via Slack alerts. Alerts are really important to the automation things. You can set Slack Alerts on env file. Here is the example of if you issue the Let’s Encrypt SSL before;

Production
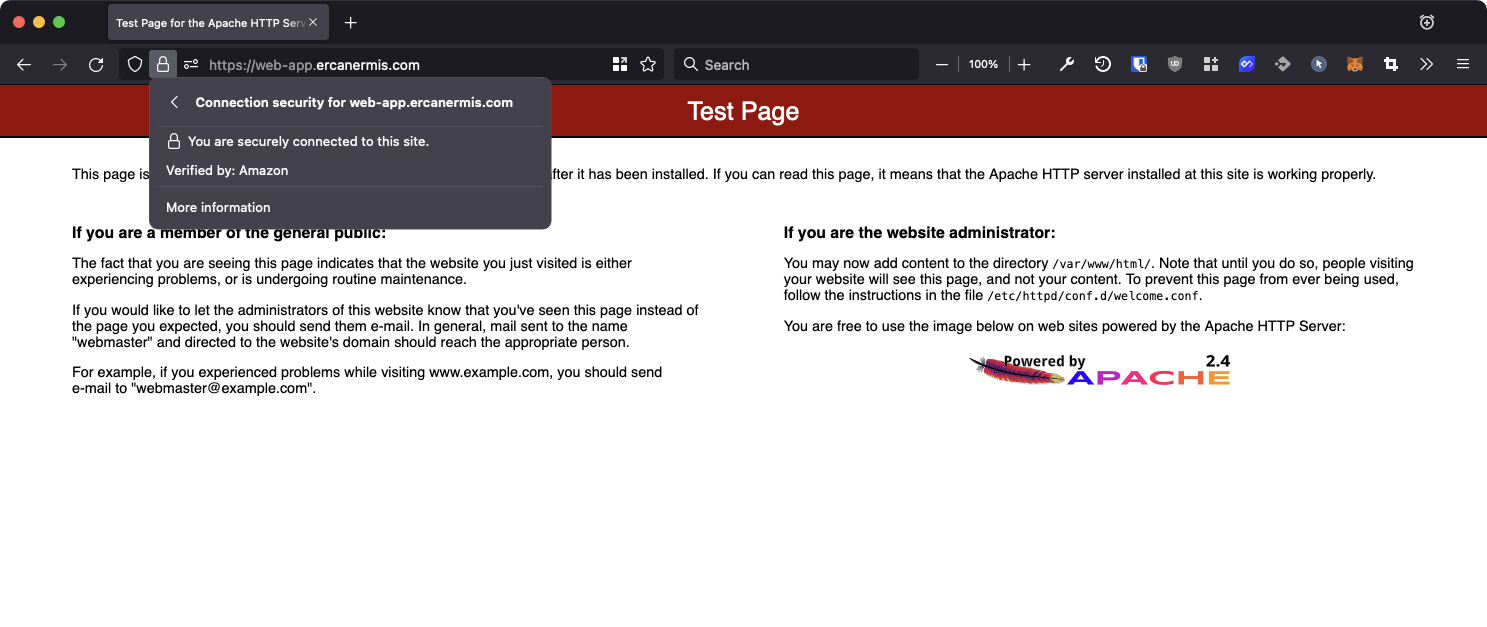
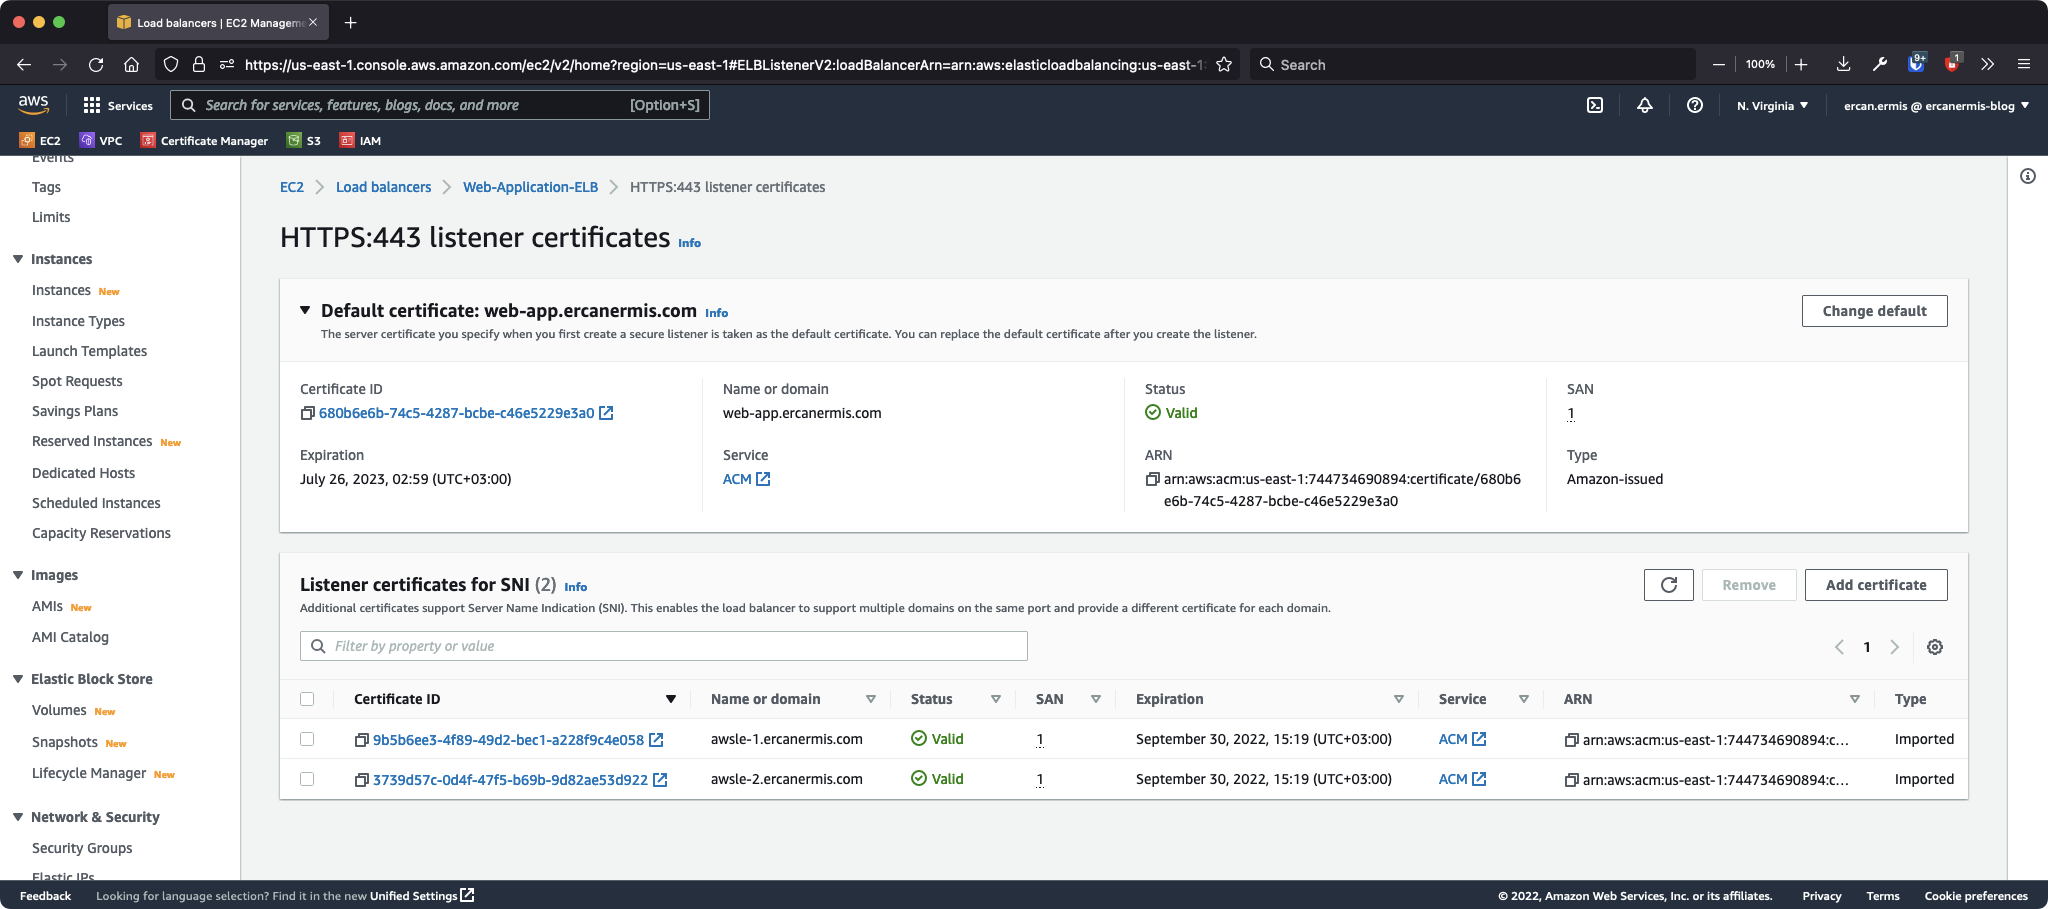
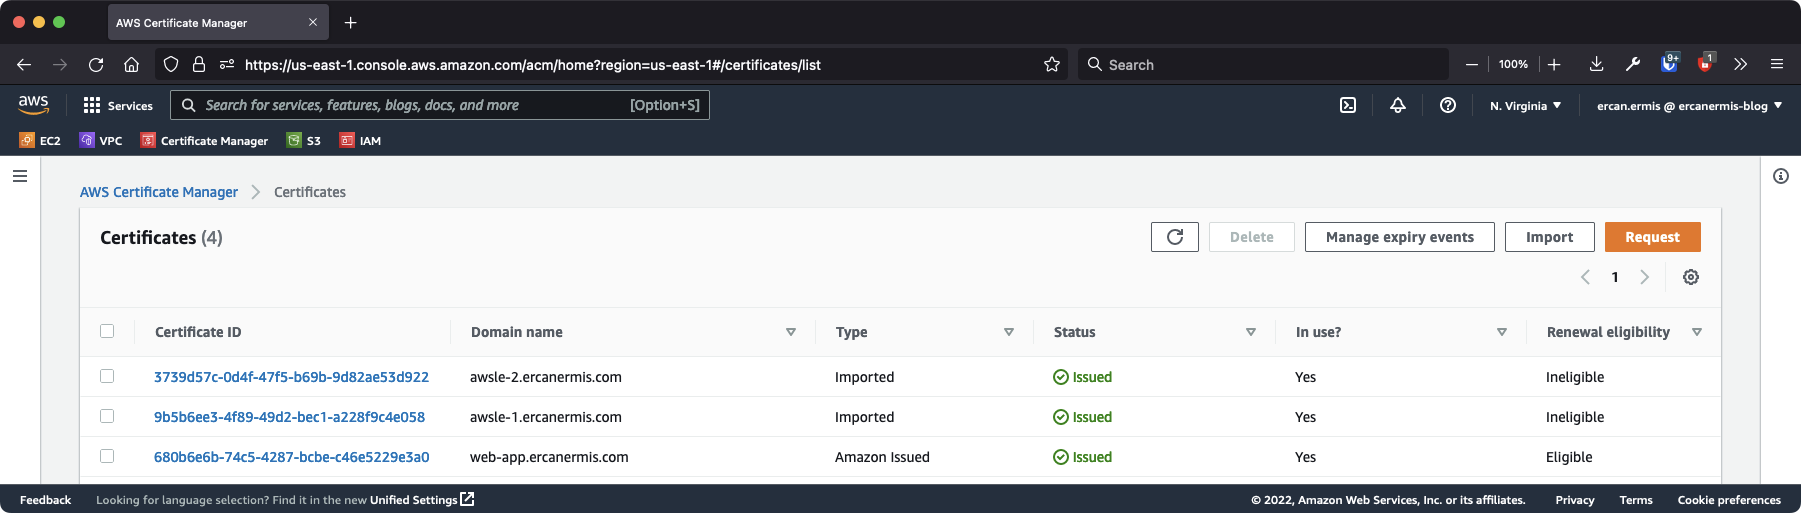
My AWS ALB DNS name is web-application-elb-1302305711.us-east-1.elb.amazonaws.com and I can access it via https://web-app.ercanermis.com It’s using AWS Certificate Manager to get an SSL.
My test domains are https://awsle-1.ercanermis.com and https://awsle-2.ercanermis.com and they are using Let’s Encrypt with AWS Application Load Balancer, yeah! : )


How AWS ALB SSL Certificates and ACM look like?
I hope, this article will help you! P.S. Don’t forget to set a cron for renewal requests.
Source code: https://github.com/flightlesstux/alble/