In this part, we will learn minikube and kubectl. We will run a Kubernetes cluster on a local computer. Let’s start for learn!
minikube and kubectl

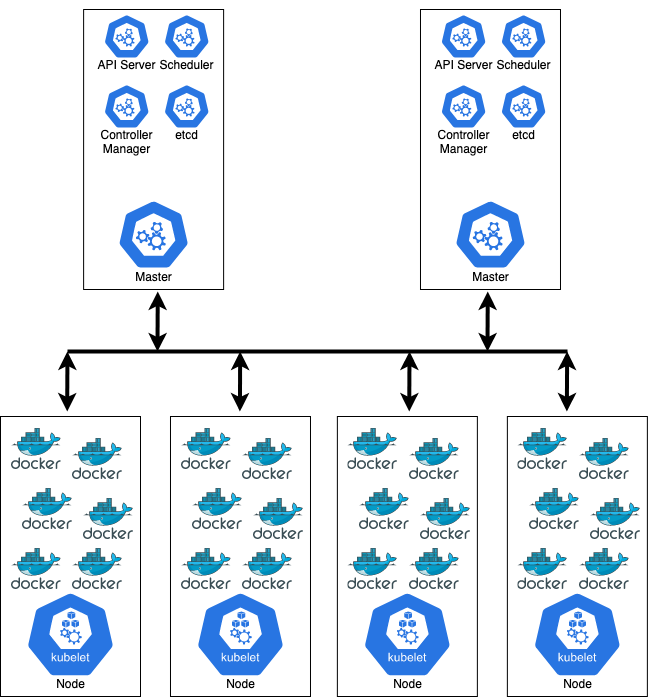
This is the minimal production cluster setup. It should contain at least two master and N nodes.
What is minikube?
Minikube means one node cluster with master and node. Master processes and node processes are both running in the same node. Minikube is an open-source tool and it comes with docker container runtime pre-installed. You are able to run docker containers easily. If you want to test something on your local machine, this is the easiest way to run it.
You can follow the https://minikube.sigs.k8s.io/docs/start/ link to download a minikube. Minikube needs virtualization on your local machine. It means you need a container runtime or virtual machine manager, such as Docker, Hyperkit, Hyper-V, KVM, Parallels, Podman, VirtualBox, or VMware Fusion/Workstation. I’m working on MacBookPro M1 and I prefer to use Docker. But if I have an x86_64-based CPU, I prefer hyperkit.
What is kubectl?
Previously we learned we can manage the Kubernetes cluster in different ways as a client. These are UI, API, and/or CLI. kubectl is a command-line (CLI) tool for managing the Kubernetes cluster.
You can create the pods, destroy the pods, create services, etc. kubectl is not just for minikube. You can also use AWS EKS, GCP Kubernetes Engine, or another cloud or on-premise Kubernetes cluster.
You can follow the https://kubernetes.io/docs/tasks/tools/install-kubectl-linux/ to download a kubectl.
Let’s Start!
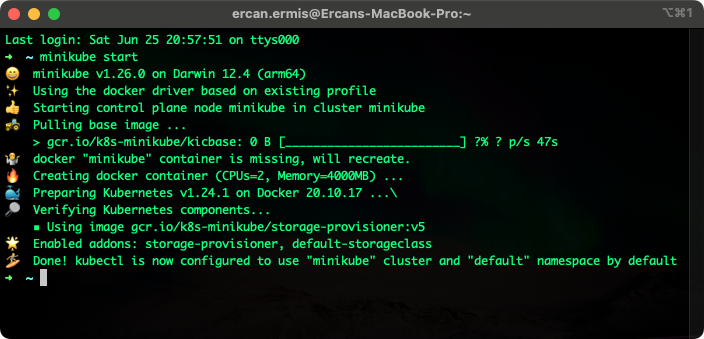
Our first command is minikube start. When you run the start command, the base image will be downloaded to install.

You can also define a --vm-driver=docker or --vm-driver=hyperkit if you need. In this step, I didn’t use it because it detects automatically. The first time, the image download will little bit take long because now, the latest image tag is v0.0.32 and the size is 1.06GB
You can see your nodes with kubectl get nodes the command. Here is an example below.
➜  ~ kubectl get nodes
NAME       STATUS   ROLES           AGE    VERSION
minikube   Ready    control-plane   16m   v1.24.1
Now, our control-plane is running. Let’s check minikube status.
➜  ~ minikube status
minikube
type: Control Plane
host: Running
kubelet: Running
apiserver: Running
kubeconfig: Configured
kubelet is a service that runs the pods using container runtime (docker) and everything looks like running. Now, let’s check the Kubernetes version with kubectl version --output=json command. You can also use output format as a YAML. I prefer to use JSON here.
➜  ~ kubectl version --output=json
{
  "clientVersion": {
    "major": "1",
    "minor": "24",
    "gitVersion": "v1.24.2",
    "gitCommit": "f66044f4361b9f1f96f0053dd46cb7dce5e990a8",
    "gitTreeState": "clean",
    "buildDate": "2022-06-15T14:14:10Z",
    "goVersion": "go1.18.3",
    "compiler": "gc",
    "platform": "darwin/arm64"
  },
  "kustomizeVersion": "v4.5.4",
  "serverVersion": {
    "major": "1",
    "minor": "24",
    "gitVersion": "v1.24.1",
    "gitCommit": "3ddd0f45aa91e2f30c70734b175631bec5b5825a",
    "gitTreeState": "clean",
    "buildDate": "2022-05-24T12:18:48Z",
    "goVersion": "go1.18.2",
    "compiler": "gc",
    "platform": "linux/arm64"
  }
}
Basic kubectl Commands
Let’s learn about CRUD operations. CRUD means Create, Read, Update, and Delete. You can see the pods with kubectl get pod command. There are no pods in the Kubernetes cluster because we installed them about a few minutes ago, it’s the normal situation. Here is an example below.
➜  ~ kubectl get pod
No resources found in default namespace.
You can see the services with kubectl get services command.
➜  ~ kubectl get services
NAME         TYPE        CLUSTER-IP   EXTERNAL-IP   PORT(S)   AGE
kubernetes   ClusterIP   10.96.0.1    <none>        443/TCP   13m
You can list any Kubernetes components with kubectl get ... command.
Create a Pod
The pod is the smallest unit of Kubernetes but we need to create a Deployment. It’s an abstraction layer over Pods. Don’t forget this. You can see the help information with kubectl create -h command and see the syntax directly.
➜  ~ kubectl create deployment lets-learn-k8s --image=nginx:latest
deployment.apps/lets-learn-k8s created
This command is taking an nginx Docker image from https://hub.docker.com immediately. If I run the kubectl get deployment I should see the Deployment name, status, etc.
➜  ~ kubectl get deployment
NAME             READY   UP-TO-DATE   AVAILABLE   AGE
lets-learn-k8s   1/1     1            1           1m9s
Cool! Now, we created an nginx deployment. Let’s check out the pods with kubectl get pod command.
➜  ~ kubectl get pod
NAME                              READY   STATUS    RESTARTS   AGE
lets-learn-k8s-8548699f99-hnh8p   1/1     Running   0          2m16s
Our pod name starts with the deployment name and after, randomized unique characters are coming. It says, our container is running and there is no issue like a crash or something. This is the minimalistic deployment type.
We have another layer on Kubernetes. This layer is managed automatically by Kubernetes and we are calling it replicaset. The command is kubectl get replicaset.
➜  ~ kubectl get replicaset
NAME                        DESIRED   CURRENT   READY   AGE
lets-learn-k8s-8548699f99   1         1         1       3m7s
Did you see the name? Pod and Replica set contains the same thing which is 8548699f99. This is the replicaset id. So, the pod name contains “Deployment Name-Replicaset ID-Container ID” format.
Replicaset is managing replicas of the pods. You don’t have to create or delete a replicaset. It’s running automatically with the deployment layer. This is the more convenient way.
Edit a Deployment
The command is kubectl edit deployment [deployment name] We should see an auto-generated deployment config in YAML format.
➜  ~ kubectl edit deployment lets-learn-k8s

# Please edit the object below. Lines beginning with a '#' will be ignored,
# and an empty file will abort the edit. If an error occurs while saving this file will be
# reopened with the relevant failures.
#
apiVersion: apps/v1
kind: Deployment
metadata:
  annotations:
    deployment.kubernetes.io/revision: "1"
  creationTimestamp: "2022-06-25T18:51:10Z"
  generation: 1
  labels:
    app: lets-learn-k8s
  name: lets-learn-k8s
  namespace: default
  resourceVersion: "5421"
  uid: 82f17009-9b5a-49c4-a545-3032f4ec56a9
spec:
  progressDeadlineSeconds: 600
  replicas: 1
  revisionHistoryLimit: 10
  selector:
    matchLabels:
      app: lets-learn-k8s
  strategy:
    rollingUpdate:
      maxSurge: 25%
      maxUnavailable: 25%
    type: RollingUpdate
  template:
    metadata:
      creationTimestamp: null
      labels:
        app: lets-learn-k8s
    spec:
      containers:
      - image: nginx:latest
        imagePullPolicy: Always
        name: nginx
        resources: {}
        terminationMessagePath: /dev/termination-log
        terminationMessagePolicy: File
      dnsPolicy: ClusterFirst
      restartPolicy: Always
      schedulerName: default-scheduler
      securityContext: {}
      terminationGracePeriodSeconds: 30
status:
  availableReplicas: 1
  conditions:
  - lastTransitionTime: "2022-06-25T18:51:23Z"
    lastUpdateTime: "2022-06-25T18:51:23Z"
    message: Deployment has minimum availability.
    reason: MinimumReplicasAvailable
    status: "True"
    type: Available
  - lastTransitionTime: "2022-06-25T18:51:10Z"
    lastUpdateTime: "2022-06-25T18:51:23Z"
    message: ReplicaSet "lets-learn-k8s-8548699f99" has successfully progressed.
    reason: NewReplicaSetAvailable
    status: "True"
    type: Progressing
  observedGeneration: 1
  readyReplicas: 1
  replicas: 1
  updatedReplicas: 1
Everything comes with default values. Now, I want to change the image tag which is now running in the latest version. I want to use tag 1.23.0 and I’m updating with the line -image: nginx:1.23.0. And let’s see what’s doing with our latest version which we created before.
deployment.apps/lets-learn-k8s edited: "1"
➜  ~ kubectl get pods
NAME                              READY   STATUS              RESTARTS   AGE
lets-learn-k8s-6788bdc674-ctjln   0/1     ContainerCreating   0          3s
lets-learn-k8s-8548699f99-hnh8p   1/1     Running             0          10m
The first pod name ends with “hnh8p” and now it’s still running and the new version container id is “ctjln” is creating. Actually downloading the image from Docker Hub. After a few seconds, the “hnh8p” should die. Let’s run again kubectl get pods command.
deployment.apps/lets-learn-k8s edited: "1"
➜  ~ kubectl get pods
NAME                              READY   STATUS              RESTARTS   AGE
lets-learn-k8s-6788bdc674-ctjln   1/1     Running             0          23s
lets-learn-k8s-8548699f99-hnh8p   0/1     Terminating         0          21m
Yes, it’s going now and “ctjln” is up and running perfectly. So, how’s replicaset? Is it changed or what? Let’s see…
➜  ~ kubectl get replicaset
NAME                        DESIRED   CURRENT   READY   AGE
lets-learn-k8s-6788bdc674   1         1         1       2m34s
lets-learn-k8s-8548699f99   0         0         0       22m
Now, we have two replicasets because another image is running now in the pod and if something goes wrong, the Kubernetes will recover the pod with tag v1.23.0. That’s the reason why we have more than one replicasets over here. We edited the deployment configuration and everything is changed automatically by Kubernetes! This is the magic touch of Kubernetes and how it’s working.
Debug
The debug command starts with kubectl logs [pod name] to see the container logs. So, the command should kubectl logs lets-learn-k8s-6788bdc674-ctjln.
➜  ~ kubectl logs lets-learn-k8s-6788bdc674-ctjln
/docker-entrypoint.sh: /docker-entrypoint.d/ is not empty, will attempt to perform configuration
/docker-entrypoint.sh: Looking for shell scripts in /docker-entrypoint.d/
/docker-entrypoint.sh: Launching /docker-entrypoint.d/10-listen-on-ipv6-by-default.sh
10-listen-on-ipv6-by-default.sh: info: Getting the checksum of /etc/nginx/conf.d/default.conf
10-listen-on-ipv6-by-default.sh: info: Enabled listen on IPv6 in /etc/nginx/conf.d/default.conf
/docker-entrypoint.sh: Launching /docker-entrypoint.d/20-envsubst-on-templates.sh
/docker-entrypoint.sh: Launching /docker-entrypoint.d/30-tune-worker-processes.sh
/docker-entrypoint.sh: Configuration complete; ready for start up
2022/06/25 19:11:44 [notice] 1#1: using the "epoll" event method
2022/06/25 19:11:44 [notice] 1#1: nginx/1.23.0
2022/06/25 19:11:44 [notice] 1#1: built by gcc 10.2.1 20210110 (Debian 10.2.1-6)
2022/06/25 19:11:44 [notice] 1#1: OS: Linux 5.10.104-linuxkit
2022/06/25 19:11:44 [notice] 1#1: getrlimit(RLIMIT_NOFILE): 1048576:1048576
2022/06/25 19:11:44 [notice] 1#1: start worker processes
2022/06/25 19:11:44 [notice] 1#1: start worker process 31
2022/06/25 19:11:44 [notice] 1#1: start worker process 32
2022/06/25 19:11:44 [notice] 1#1: start worker process 33
2022/06/25 19:11:44 [notice] 1#1: start worker process 34
We have another useful command which is kubectl describe pod. [pod name]. This time we need a pod name to see what’s happening at the pod layer in the background of Kubernetes. Now, my command is kubectl describe pod lets-learn-k8s-6788bdc674-ctjln
➜  ~ kubectl describe pod lets-learn-k8s-6788bdc674-ctjln
Name:         lets-learn-k8s-6788bdc674-ctjln
Namespace:    default
Priority:     0
Node:         minikube/192.168.49.2
Start Time:   Sat, 25 Jun 2022 22:11:41 +0300
Labels:       app=lets-learn-k8s
              pod-template-hash=6788bdc674
Annotations:  <none>
Status:       Running
IP:           172.17.0.4
IPs:
  IP:           172.17.0.4
Controlled By:  ReplicaSet/lets-learn-k8s-6788bdc674
Containers:
  nginx:
    Container ID:   docker://1619239ceea5cc3a254b8f65b57932b8fbb69f2f610de5935d961a8db38d4d24
    Image:          nginx:1.23.0
    Image ID:       docker-pullable://nginx@sha256:10f14ffa93f8dedf1057897b745e5ac72ac5655c299dade0aa434c71557697ea
    Port:           <none>
    Host Port:      <none>
    State:          Running
      Started:      Sat, 25 Jun 2022 22:11:44 +0300
    Ready:          True
    Restart Count:  0
    Environment:    <none>
    Mounts:
      /var/run/secrets/kubernetes.io/serviceaccount from kube-api-access-k4lxf (ro)
Conditions:
  Type              Status
  Initialized       True
  Ready             True
  ContainersReady   True
  PodScheduled      True
Volumes:
  kube-api-access-k4lxf:
    Type:                    Projected (a volume that contains injected data from multiple sources)
    TokenExpirationSeconds:  3607
    ConfigMapName:           kube-root-ca.crt
    ConfigMapOptional:       <nil>
    DownwardAPI:             true
QoS Class:                   BestEffort
Node-Selectors:              <none>
Tolerations:                 node.kubernetes.io/not-ready:NoExecute op=Exists for 300s
                             node.kubernetes.io/unreachable:NoExecute op=Exists for 300s
Events:
  Type    Reason     Age   From               Message
  ----    ------     ----  ----               -------
  Normal  Scheduled  30m   default-scheduler  Successfully assigned default/lets-learn-k8s-6788bdc674-ctjln to minikube
  Normal  Pulling    30m   kubelet            Pulling image "nginx:1.23.0"
  Normal  Pulled     29m   kubelet            Successfully pulled image "nginx:1.23.0" in 2.425653376s
  Normal  Created    29m   kubelet            Created container nginx
  Normal  Started    29m   kubelet            Started container nginx
You can see the state changes as a message and see other information as well.
We have another powerful command to get into the container. The syntax starts with kubectl exec -it [pod id] — bash. This command is understanding the application problems in the container. The full command should be kubectl exec -it lets-learn-k8s-6788bdc674-ctjln bash -- bash. I want to see nginx main config directly from the container. You should know the Linux here : )
➜  ~ kubectl exec -it lets-learn-k8s-6788bdc674-ctjln bash -- bash
root@lets-learn-k8s-6788bdc674-ctjln:/# cat /etc/nginx/nginx.conf

user  nginx;
worker_processes  auto;

error_log  /var/log/nginx/error.log notice;
pid        /var/run/nginx.pid;


events {
    worker_connections  1024;
}


http {
    include       /etc/nginx/mime.types;
    default_type  application/octet-stream;

    log_format  main  '$remote_addr - $remote_user [$time_local] "$request" '
                      '$status $body_bytes_sent "$http_referer" '
                      '"$http_user_agent" "$http_x_forwarded_for"';

    access_log  /var/log/nginx/access.log  main;

    sendfile        on;
    #tcp_nopush     on;

    keepalive_timeout  65;

    #gzip  on;

    include /etc/nginx/conf.d/*.conf;
}
Delete the Deployment
If you want to delete a deployment, it’s also easy like creating. The command is kubectl delete deployment [deployment name]. Here is the example below.
➜  ~ kubectl get deployment
NAME             READY   UP-TO-DATE   AVAILABLE   AGE
lets-learn-k8s   1/1     1            1           47m

➜  ~ kubectl delete deployment lets-learn-k8s
deployment.apps "lets-learn-k8s" deleted
Yes, there is no more deployment, replicaset, and pod(s).
➜  ~ kubectl get deployment
No resources found in default namespace.

➜  ~ kubectl get replicaset
No resources found in default namespace.

➜  ~ kubectl get pod
No resources found in default namespace.
Apply
If you are writing a service file in YAML format, you can also push your customized configuration into Kubernetes. For this operation, you should run kubectl apply -f [file name].
I hope you enjoyed with my “Let’s Learn Kubernetes – Part 3”. You can follow me on Twitter (https://twitter.com/flightlesstux) to know when Part 4 is coming…